December 15, 2011

Christmas Trees and Mantels

Since I seem to be going through a peacock phase, this year my mantel is decorated with peacock feather ribbon, gold mesh, mercury glass and gold, and a collection of vintage and antique mirrors. Peacock blue ornaments with flocked paisley detail are nestled in tall glass hurricanes and our gold tree topper angel reigns over all this glittery goodness.


One client has a large accent wall in her family room with a niche for the fireplace and aquarium. The 12-foot tall tree lights up one corner. I filled several wire bird cages and boxes with small ornaments. Grouping ornaments in bunches of threes and fives for the tree for more appropriate scale, I topped it with a HUGE bow made of 5" wide ribbon, and smaller bows are spaced randomly. Once the larger bunches of ornaments and bows were in place, collected family ornaments were added. A collection of Santas is displayed throughout the family room.


The stair rails are embellished with garland and luxuriously draped gold mesh ribbon. More clusters of ornaments hang below the bows, and another huge bow tops the newel post. Christmas decorations are much more lush and full with plenty of ribbon, which is really inexpensive.


I didn't get a good picture of some of this, but here are some tips for decorating beautiful trees:
  • hot glue ornament caps on so that they will be secure
  • using green floral wire, string together clusters of like-color, solid color ornaments which can be used in place of, or in addition to, the really BIG ornaments you can buy in packs of 2 or 4. They're usually plastic instead of glass. These are preferable for any tree that is taller than 7'.think of your tree in three sections- from the trunk OUT toward the tips of the branches. Hang the largest ornaments (or clusters) toward the TRUNK of the tree to help fill in any gaps that may be between the branches. This serves two purposes: 1) it fills in gaps and 2) it reflects the lights so your tree looks like it has more lights. It REALLY does work. The huge ornaments should be shiny, not matte finish for more reflective quality, and should be the "main" color you are using on your tree.
  • if you have a green Christmas tree, hang your ornaments and decorations with green floral wire instead of those silvery wire hangers that come in little packets
  • the "middle" section of your tree should be the secondary color and should have the mid-size ornaments and a few of the larger ones
  • the "outside" section, or the ends of the branches, should have the smaller of the ornaments, often family-made and collected-over-time
  • stems and picks are also excellent fillers if needed

We've somehow managed to amass a large collection of stockings (perhaps because I LOVE stockings of so many styles and colors of them!), and since my mantel is currently CHOCK FULL of all kinds of prettiness, there is no room for stocking hangers. 


I decided to use the metal scrollwork hanging over my sofa table. Using the same ribbon as on the mantel, I made a large bow for the center and two smaller bows for the ends. After hanging the stockings where I wanted them I wove the ribbon through the metal scrolls and stockings, allowing some tails to hang from the bows. The whole display is 3 1/2' tall and 5 1/2' wide.


MERRY  CHRISTMAS!!


December 13, 2011

Q: What's black & white & silver all over? A: Christmas!

A client commissioned me to design their home for several Christmas events. As there is potential for a move in coming months, the homeowners did not want to “go all out,” and we decided a two-phase approach is best. To this end, we developed a plan to get the basics done this year, which includes garlands, ribbon, bows, and a few accessories which would be appropriate for a January wedding reception being held in the home as well. The “second phase” will include additional ornamentation  appropriate for the new house, if the move does occur, and if it doesn't, more goodies for this house. Primary focus of the effort was on the entry, dining, and stairs areas at the front of the home. 


Flanking the front door is a pair of 7 ½’ slim trees in copper-finish planters with moss lining. These trees were bought at auction, were ugly, and had non-working lights wired on. It was a lot of work to remove all the lights and decorations and get it rewired! These trees are super heavy-duty and extremely THICK. I made 3x6" burlap strips to wire on  and that combined with the white lights are the only ornamentation  at this time. It looks incomplete in this setting but tree-topper bows and other elements will be added. A welcome mat and other accessories to be added by the homeowner. Fresh evergreen wreath holds the large double-ribbon bow.


All this luxuriously thick garland is entirely custom and may I say that it took FOREVAH to make all of it. Each 9' section is made up of 3 strands of garlands- 2 sea grass and 1 very inexpensive “promo” garland. The three strands have been wired together for strength and long-term use. The sea grass garland is all that is visible and it is very thick, feathery, and the tips have a purple tint to them that look black because they are combined with other black elements. They. Are. GORG.


Phase 2 includes adding a lighted slim tree to the landing area, if the homeowners are still in this house. The 44 bows used on the stairs are made up of double-ribbon and long tails. They help hide the “hardware” used to hang the garland, including plastic zip ties, which became my bestest friend as they could handle the weight load of this very full  and lush garland. 


This dining room literally had a BARE BULB as a light fixture! As the homeowners decided not to purchase a chandelier this Christmas, I came up with the plan to hang an upside down wreath from the ceiling, and ornaments from the wreath. The effect of the little lights I wired into the wreath is so beautiful! The homeowners and other folks who were there just after it was installed were awe-struck and I was so pleased that I literally squealed as I clapped and jumped, which was a little embarrassing, but you know, it is ME


The custom 30” sea grass wreath is lighted with 200 miniature white lights. It is plugged into the ceiling for direct power, and controlled by the switch plate on the  wall. Pink glitter-striped and silver snowflake ornaments dangle from silver swirl ribbon. A large bow disguises the hardware and the long tails hang straight down. Silver grasses are woven throughout the garland.

Dual bunches of three- 48” tall white branches adorn the corners of the dining room opposite the server. Three of each 6-stem bunches are wired with white frosted battery-powered lights. The power boxes will be “hidden” by black shred once turned on. These can be removed quickly & easily when not entertaining, if desired.


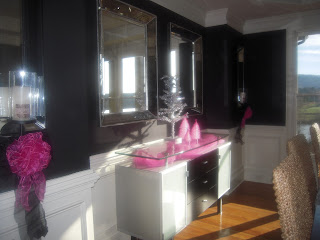
Large-scale mirrors flanked by mirrored candle sconces now frame the buffet. A silver tinsel tree and trio of pink bottle brush trees are centered on the glass top, beneath which is pink tulle. The mirrored sconces are home to black and pink double bows and vanilla candles. Dual bunches of three- 48” tall white branches adorn the corners of the dining room opposite the server. 


A trio of 4x15” vanilla-scented pillar candles sit atop the large espresso stained table. The homeowners’ dinnerware is white with silver snowflakes, so the two table runners have silver beaded snowflakes and branches details above the beaded tassel trim. The candles are each surrounded by small pink ornaments which rest on black shred. The clear glass hurricanes sit in black iron bases, with the center base inverted to add more height and visual interest to the center candle. The silver table runners are placed along the width rather than the length of the table.


The homeowner’s 11 year old daughter decorated the 10’ slim tree in all pink and black. Except for the bow, she did it all herself and I think she did a GREAT job!  I made the triple-ribbon bow and it’s HUGE. It has 12- 6’ long tails. 


Because this side of the stairs faces the Christmas tree, the garland, although still black, white and silver, has a few large-scale pink ornaments hanging just below the tails of the large bows. There was an empty silver vessel sitting on the end table so I filled it with more ornaments.  The homeowner is to replace the caramel-colored candles.


The wreath above the front door has all kinds of “jewelry” on it- lots of BLING that’s not really Christmas-y, but in this home it works really well. A large, thick glass ornament with a picture of a black chandelier in it hangs from the bow. The same ribbons used throughout the house are used on the wreath and glittery black ornaments including black snowflakes and crystal dangles are on it. It DRIPS with jewels. TERRIBLE picture of a really pretty wreath!


Merry Christmas-making, everyone!


September 6, 2011

All the King's Horses and all the King's Men... SNORE NO MORE... and ME

Far be it for me to rest idle on a holiday weekend...

Flowery Branch Antique Market is the first full weekend of each month and now that I have a large booth there I spend a great deal of time refurbing, repurposing, and cosmetically reworking furniture and accessories. I absolutely LOVE making junk into useful and beautiful treasures!! The down side I've found is that it feeds my furniture addiction, but that might not be such a bad thing. :-)


Here are some of the latest "creations" of mine, more Before & Afters:


These end tables had plenty of potential and had obviously had a rough life. I think someone didn't have any coasters...


Lots of sanding, good primer, and fresh paint made a world of difference. And I just noticed that I took a picture before the hardware was all installed. hmmmm... 


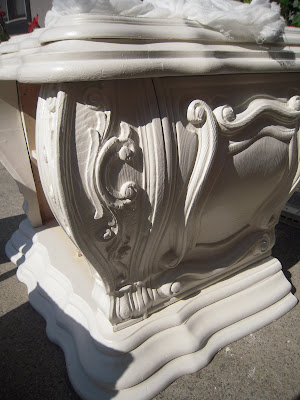
I'm particularly excited about the result of work on some baroque style bedroom furniture. It was a COMPLETE disaster when I got it. I've had to do a lot of work on furniture before, but I've NEVER.SEEN.ANYTHING.LIKE.THESE.PIECES. NONE of the drawers worked properly and one drawer was missing all its pieces but the front. It looked as though the top of this furniture had been used for wet drinks, ashtrays, and possibly deep frying (guessing on that from the amount of grease that was caked on and under the drawers). This certainly seemed like a Humpty Dumpty case to me and there were times when I wondered if I really COULD put all the pieces back together again, OR if I should even bother.

See that BLOB of goo toward the right front of the bottom drawer area, and the BLOB about halfway back closer to the middle of the same drawer area? That was TAR. Or some substance with qualities very similar to tar.


Here is an in-progress closeup of one of the drawers. You can see how much TSP I had to use along with my wire brush. I actually used my garden hose INSIDE the drawer casements along the back, sides, and dust covers, and scrapers & screwdrivers to remove some sort of tar-like goo that was in clumps inside. EWW.

The sea of drawers that have been cleaned, awaiting the next step. A key piece of this gigantic furniture puzzle was LABELING each of the pieces as I removed them, INCLUDING the hardware. Because each drawer front was shaped, it really did matter where they went back in and how. I used a sharpie marker and labeled in the under side of each drawer as I went along, repairing both the tracks and reassembling the drawers themselves with wood glue. 


Already it looks much better, having been repaired, sanded, primed, sanded again, and painted. I only used one coat of paint since I planned to glaze.

Here you can REALLY see the difference glaze makes! I used Martha Stewart's "Black Coffee" metallic glaze over "Cinnamon Cake" color Sherwin Williams satin finish paint. "Cinnamon Cake" is a Behr color but they can formula match it at SW and it is my go-to cream color- I LOVE the undertones of this paint; it's the perfect cream and even works alongside Heirloom White spray paint. The glaze doesn't look as starkly BLACK in person as it does in the above picture; it's really closer to the color in the picture below. "Black Coffee" is the perfect name for this glaze and it is GORGEOUS; having an indefinable "is it black or is it dark brown?" look, and in the sunlight the SLIGHT metallic shimmer is stunning.


One piece down, a gazillion more to go... this is one project that threatened to overwhelm me, but I just took my time and did one painfully slow step at a time. Daubing the glaze on with my paintbrush and using cheesecloth to wipe most of it off, around and in all those crevices took FOREVAH but the effect is definitely worth it.

I didn't get a picture of the mirrors before I removed the backing and glass. Here they are about to be assaulted with TSP and a wire brush. :-)


Mirror frame on the left has been coated with automotive primer (spray), and the one on the right has one coat of paint on it. Same process was used on the mirrors as the other pieces- cleaning, priming, painting, glaze, and cheesecloth. I was unsure how the glaze would work with spray paint, since the glaze is water-base and spray paint is of course oil based. It worked really well; although I wouldn't do that on a horizontal surface that might see some wear & tear, on a mirror frame it was perfect.


All dressed up and ready to go home with someone...

detail view- top of one mirror

detail view- corner of one mirror

The finished chest. It is 63" tall, 35" wide, and 21" deep. That's large. I had to stand on a ladder to sand, prime, paint, and glaze the top because it's exactly the same height as I. :-)

Detail view of chest, drawers slightly open to show the English dovetail construction.

I painted all the brass hardware "dark bronze" after cleaning and priming each piece.

OH the difference working on something 4 hrs a day/5 days a week for 2-3 weeks can make!
Here's a side-by-side comparison of before & after of the nightstand:


These pieces are not my personal "style," but I have to admit that I did think about keeping the nightstands and mirrors. They would be SOO lovely with the mirrors hung each over a mirror,  flanking a bed. Very dramatic. 

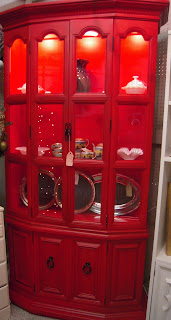
I made cosmetic-only changes to a china cabinet using some UBER BRIGHT red paint (fire engine RED, baby!), called "Sweet Tomato" and the leftover glaze from the baroque furniture project:
SNORE! to say the least, but...

Sweet Tomato spray paint applied...

 glaze applied, and...

That china cabinet is STACKED!

SNORE NO MORE!!